LOGIN
  • Post to the EFV-8 Forum
  • Post Classified Ads
  • Shop the Online Store
User Login

Not Registered Yet? Click Here to Sign Up!


(Forgot your Password?)
Remember me on this computer

Not registered yet?
REGISTER NOW!

Back to Home Page Show Forum Rules

Early Ford V-8 Club Forum

FORUM RULES: Users agree to these Rules when using Forum.

The site administrator reserves the right to change the terms and conditions of the user agreement without prior notice to the user. It is the responsibility of the user to regularly review the terms of this agreement.

The user agrees to the following terms:

  1. All information that you provide to us for your membership is correct.
  2. You will not use your membership to spam, harrass, or exploit other members in any way.
  3. Vulgar, Abusive, Racist and Sexist Language will not be tolerated.
  4. Commercial-type sales postings will not be allowed.
  5. No mass posting or flooding of the boards is allowed.
  6. No Advertising of parts or cars; no Ebay or business/commercial ads (please use the "Classified" for ads Wanted or For Sale).
  7. VIEWING MULTIPLE TOPICS ON SCREEN: You can choose to see more than 10 Topics at a time ... Log In and choose "Preferences" from the top bar on the Forum page. Scroll down and Change the "Default Topics Returned" parameter to 25 or 50, and save the changes. Since this setting is stored in your browser 'cookies' (if enabled), it seems to use that stored value even if you are not logged in. So, if you use a PC that you haven't logged into the forum from, the setting still seem to remain at the default.
  8. EXTERNAL PHOTO LINKS ON FORUM: You can still use external photo links in your posts on the new forum. They follow the rules of any link in that they have to have the URL link qualified down to the full image file name (example: .jpg). The links will open in a new browser window, the same as an uploaded image attached to a post. Since an image attachment to any post does not display inline with the post, the results are the same. You can use multiple external links within a post. This link is from photos on a site from Don Clink's 'Deuce@75' albums:

    http://donclink.com/deuce_75_1/images/dscn2950.jpg

    Using links from photo sites such as Photobucket can help in "size" issue with uploaded attachment files. For best viewing in web browsers, photos should be around the 800x600 pixel range, and probably not more than 1024x768. Most cameras today store HUGE jpg image files, as the default settings are in the 7, 8, 10, and 12Mb image sizes. The image files that are then attached are very large, and the browser can't display the full image size without using the scroll bars. Use the re-sizing functions of your photo editing software to reduce the image to 800x600, which reduces the file sixe and the image load time in the browser. Don uses Google's free Picassa3 software, which is an excellent photo management product. All of the photo albums of the Deuce, Grand National, and Auburn that are links on the NORG site were built using Picassa's web creation functions. And it's free? (THANKS to Don Clink for the info!)
  9. HOW DO I SHOW MY EMAIL ADDRESS ALONG WITH MY USERNAME? You can LogIn on the Forum, and select PREFERENCES. On this page Members can add optional information such as their City,State, Country; Occupation; Hobbies: list a Homepage; list AOL Instant Messanger Handle; Signature; "Make Email Address viewable to others;" and even change the number of Default Topics shown on a page. WHEN others click on your profile, they will see this information.

EFV-8 Club Forum / 1940 Ford Discussion / Finished Mechanically!

   Reply to this DiscussionReply to Discussion | Start new discussionNew Discussion << previous || next >> 
Posted By Discussion Topic: Finished Mechanically!

Printer-friendly Version  send this discussion to a friend  new posts last

RAK402
05-20-2021 @ 2:47 PM
Member
Posts: 438
Joined: Jul 2015
          
Finished Mechanically!

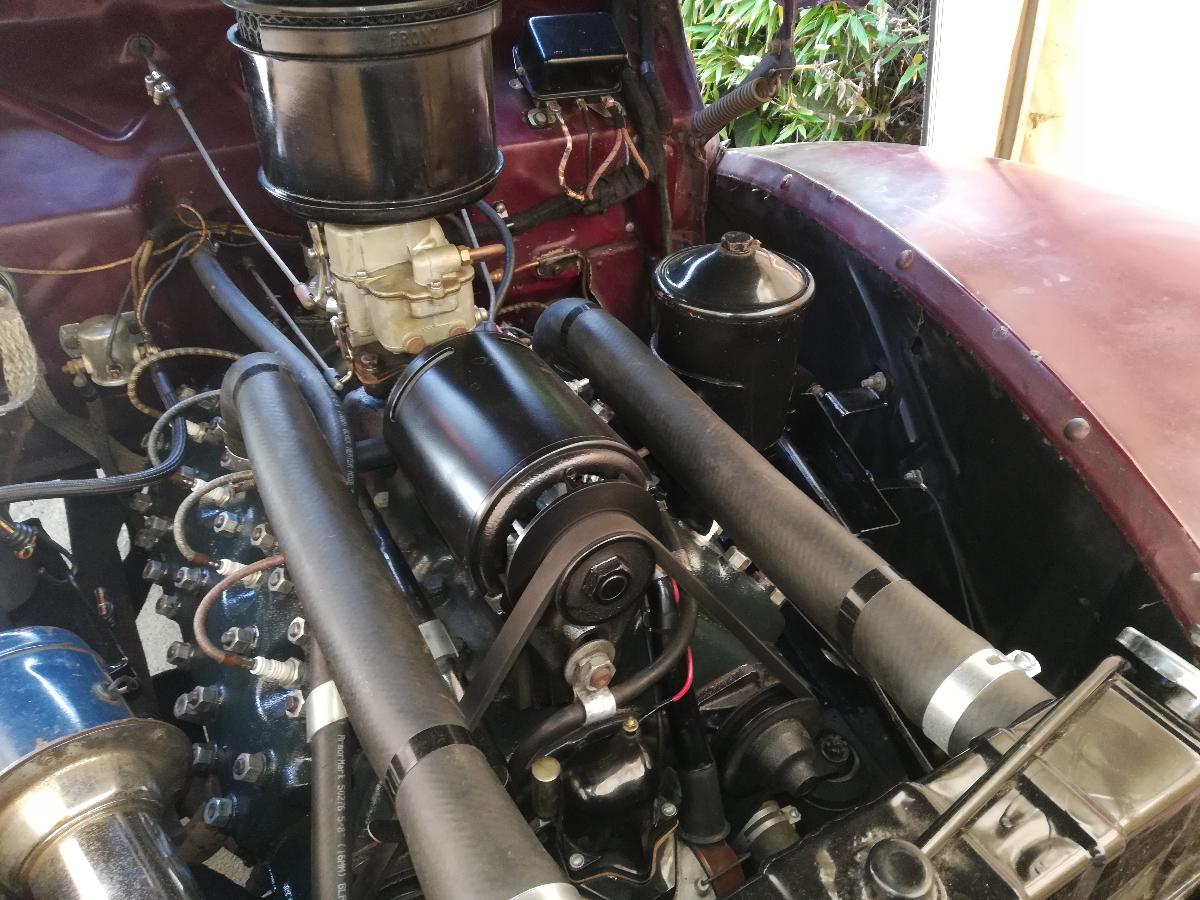
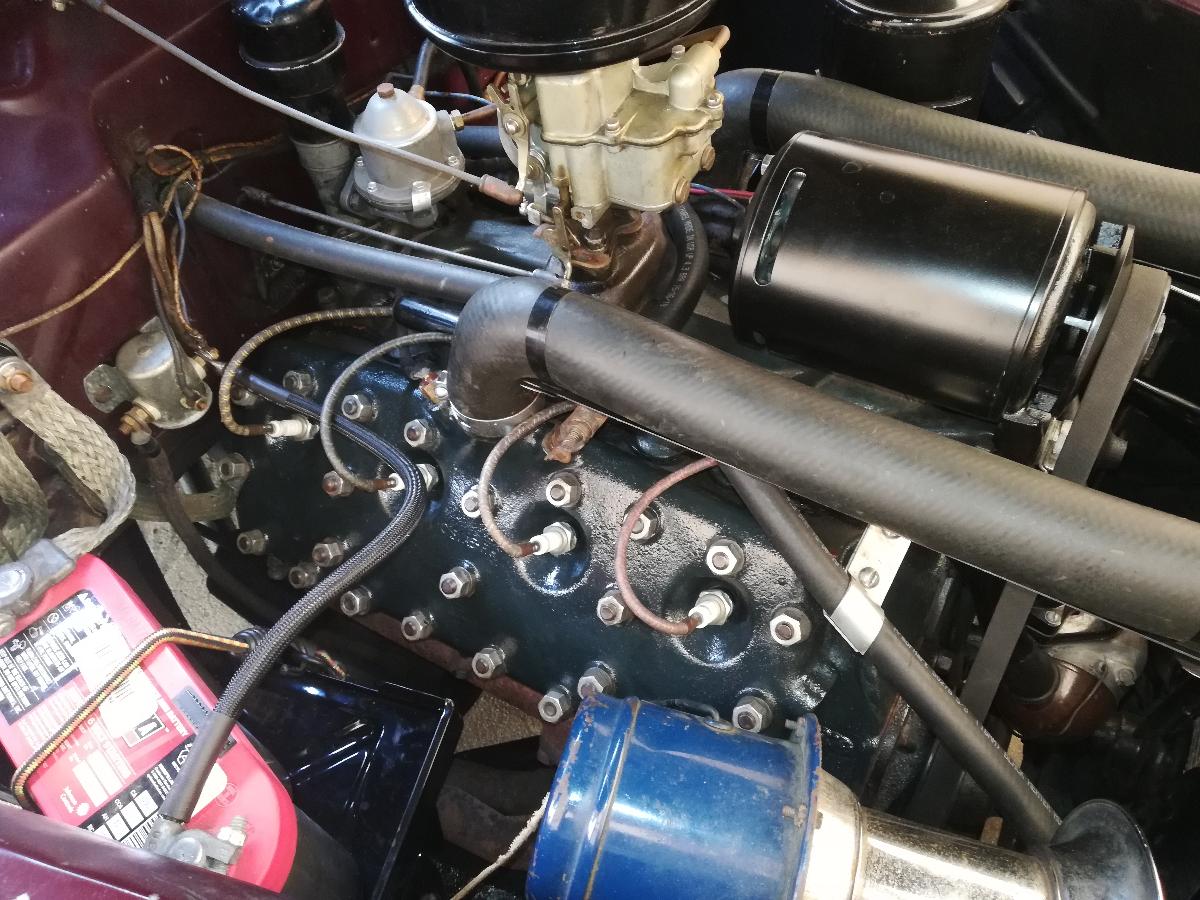
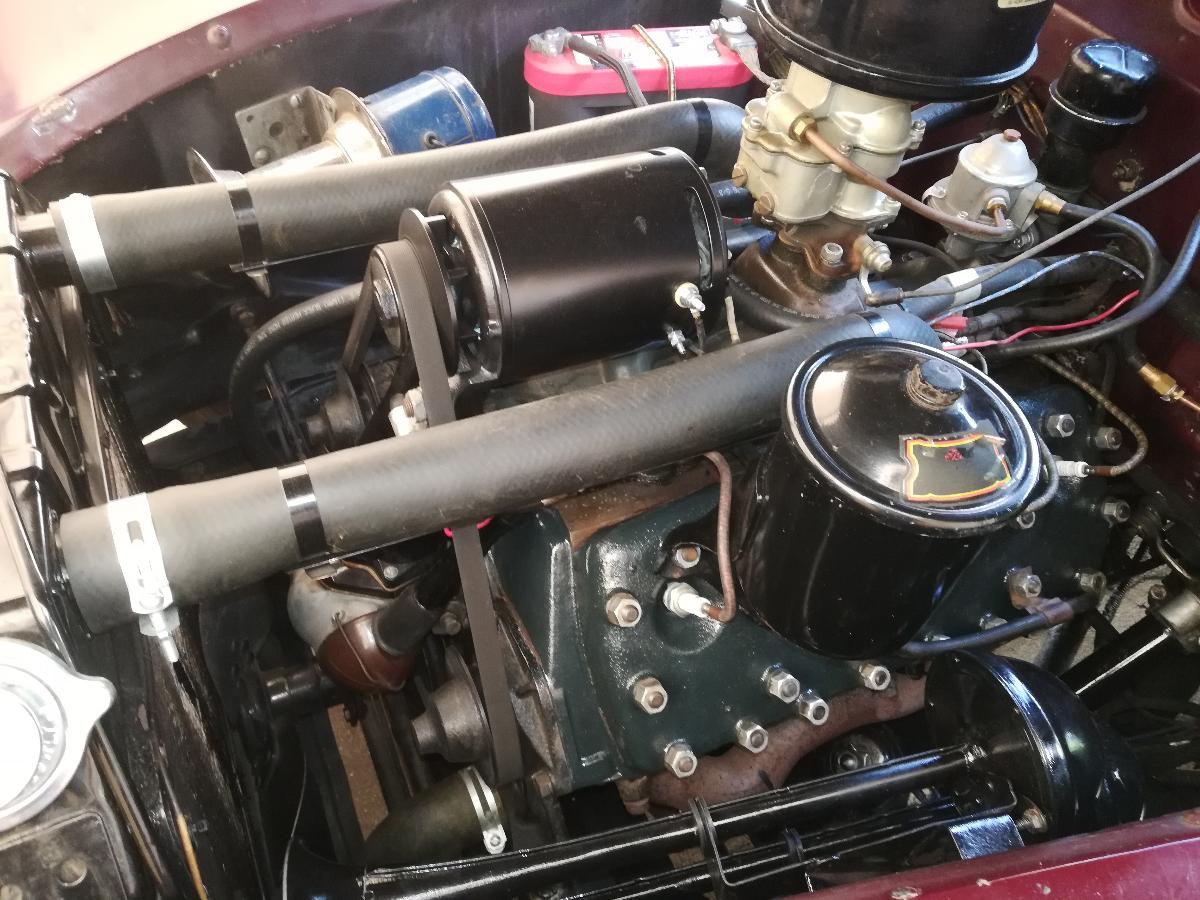
My 1940 Ford Fordor Deluxe is now finished mechanically and will soon have to be taken partially apart cosmetically to be painted.

In the meantime, I intend to drive it over the next couple of weeks!

It runs beautifully, stops easily, the temperature stays within range, and the battery stays charged.

It will get a correct battery after painting.

And yes, I know the ahoogha horn is incorrect, but it has been in the car since 1975, so it stays. It will get cleaned up a bit.

Over the last five years:

New radiator, new brakes, N.O.S. carb, NOS Battery Gauge, repaired Emergency Brake Spring, working vacuum windshield wiper motor (the horrible, useless, electric "upgrade" windshield wiper motor removed), E. J. Whitney Alternator installed, Shocks rebuilt by 5-Points, Steering Gearbox rebuilt by Richard Williams restorations, new tie rod, new drag link, new king pins, new spindle bushings, new Emergency Brake Cable Grommet, new Radius Arm Ball, new Anti-roll bar bushings and swivels, NOS temperature sensors, hidden ammeter installed, new gas tank, new gas gauge sending unit, turn indicators, working radio, new instrument panel plastic (steel re-enforced from the inside to help prevent heat warpage), thermostats modified so that they cannot crawl up the hosed and tip, new radiator hoses, new brake hoses, new fuel pump, new wind-wing rubber seals, new rear quarter window rubber seals, new shock links.

This message was edited by RAK402 on 5-20-21 @ 2:51 PM

JayChicago
05-20-2021 @ 3:01 PM
Member
Posts: 484
Joined: Jan 2016
          
Looks great. You did a lot of work. Maybe you should now give yourself a break. Enjoy driving it over the summer.

RAK402
07-12-2021 @ 8:23 PM
Member
Posts: 438
Joined: Jul 2015
          
The weather here has been getting hotter, so when it hit 90 degrees I took the Ford out and drove it around locally.

In retrospect, with the poor reproduction temperature sensors it was hard to know what was really happening when it appeared to be overheating in the past. I do know that one of the repro sensors was going open at 175 degrees.

No sign of over heating now, measure with the gauge, an infrared temp gun, and a thermometer installed in the radiator cap!

trjford8
07-13-2021 @ 6:14 AM
Senior
Posts: 4218
Joined: Oct 2009
          
That engine compartment looks very nice. Great job.

RAK402
07-13-2021 @ 11:06 AM
Member
Posts: 438
Joined: Jul 2015
          
Thank you!

flatcreeker
08-30-2021 @ 11:18 AM
Member
Posts: 48
Joined: Feb 2021
          
Fabulous looking engine. I am the new owner of a '39 Merc and reading a lot of posts for the education. This is also my first flathead. I decided I needed a new toy in my 75th year. I am having a ton of fun!

Would love to see photos showing the detail of your under-hood firewall.

I would love details of your hidden amp meter. Been considering that and a hidden direct reading oil pressure gauge. Inquiring minds want to know.

Best of luck with your fabulous forty!

This message was edited by flatcreeker on 8-30-21 @ 11:21 AM

same
08-30-2021 @ 5:07 PM
Member
Posts: 92
Joined: Jun 2020
          
RAK402,nice work. more pics,when time allows. tom.

RAK402
08-31-2021 @ 9:13 PM
Member
Posts: 438
Joined: Jul 2015
          
flatcreeker,

Thank you for the kind comments sir.

For what things should really look like under the hood, the new 1940 Ford Book "It's Ford for '40" is the best reference to date. The author is Mike Kubarth (Kubes40 here on the forum) and I have learned a great deal from his answering my questions here and from the book. Your '39 Mercury will be somewhat different from the Ford of the same year.

Regarding the ammeter, I removed the left (Driver's side) ash tray (just the internal part that the actual ashes fall into), made a small bracket, and installed what was sold to me as a 1938 Ford "Loop" style ammeter (I had to cut the edges of the ammeter to fit).

The connection lug on the yellow wire coming from the left side of the starter solenoid was cut off at the voltage regulator and the wire extended through the dash grommet, through the loop in the ammeter, then back through the dash grommet where it was reconnected to the lug. From a circuit standpoint, it is exactly where it would have been in a 1939 Standard or earlier Ford (or a 1941 or later Ford).

It reads anytime anything is turned on in the electrical system. It tells me if the system is charging or not (which the voltmeter does not do-the voltmeter gives the condition of the battery at the moment). The volt meters were used by Ford in the 1939 Deluxe, and the 1940 Deluxe and Standard, then Ford went back to the ammeter. It is nice to have both to have more information about what is going on with the battery/charging system.

In this video, I turn the parking lights on, then the headlights, then back to the parking lights, then off. When the engine is running, is shows the rate at which the battery is being charged. When the ash tray is closed, you cannot tell that non-stock ammeter is there.

https://youtu.be/0aV4c-E0ymw

same/tom,

Thank you too!

I will take some more photos when I get a bit further sir. I still have not taken it apart cosmetically to get it painted.

This message was edited by RAK402 on 8-31-21 @ 9:32 PM

<< previous || next >> 


NOTE: YOU MUST BE A REGISTERED USER AND BE LOGGED IN TO POST (and reply to) messages in this forum. If you are a first time user, please click the CREATE A NEW ACCOUNT in the masthead above to register and Log In. After that, all you do is LOG IN to enjoy using this site.

DISCLAIMER: The V-8 Club does no independent testing of any of the opinions, thoughts or suggestions presented in the website on the Forum, in the Tech Tips section, or any section. A reader should consider the website to be a forum wherein differing solutions to a particular set of circumstances may be discussed. Ultimately, the selection of an item for an individual's vehicle must be based upon the independent study of the vehicle owner in consultation with people in the hobby and restoration experts.


EFV-8 Club Forum Home | Back to Home Page | Contact the Webmaster

Copyright © 2009 - EFV-8.org
Powered by < CF FORUM > v.2.1