LOGIN
  • Post to the EFV-8 Forum
  • Post Classified Ads
  • Shop the Online Store
User Login

Not Registered Yet? Click Here to Sign Up!


(Forgot your Password?)
Remember me on this computer

Not registered yet?
REGISTER NOW!

Back to Home Page Show Forum Rules

Early Ford V-8 Club Forum

FORUM RULES: Users agree to these Rules when using Forum.

The site administrator reserves the right to change the terms and conditions of the user agreement without prior notice to the user. It is the responsibility of the user to regularly review the terms of this agreement.

The user agrees to the following terms:

  1. All information that you provide to us for your membership is correct.
  2. You will not use your membership to spam, harrass, or exploit other members in any way.
  3. Vulgar, Abusive, Racist and Sexist Language will not be tolerated.
  4. Commercial-type sales postings will not be allowed.
  5. No mass posting or flooding of the boards is allowed.
  6. No Advertising of parts or cars; no Ebay or business/commercial ads (please use the "Classified" for ads Wanted or For Sale).
  7. VIEWING MULTIPLE TOPICS ON SCREEN: You can choose to see more than 10 Topics at a time ... Log In and choose "Preferences" from the top bar on the Forum page. Scroll down and Change the "Default Topics Returned" parameter to 25 or 50, and save the changes. Since this setting is stored in your browser 'cookies' (if enabled), it seems to use that stored value even if you are not logged in. So, if you use a PC that you haven't logged into the forum from, the setting still seem to remain at the default.
  8. EXTERNAL PHOTO LINKS ON FORUM: You can still use external photo links in your posts on the new forum. They follow the rules of any link in that they have to have the URL link qualified down to the full image file name (example: .jpg). The links will open in a new browser window, the same as an uploaded image attached to a post. Since an image attachment to any post does not display inline with the post, the results are the same. You can use multiple external links within a post. This link is from photos on a site from Don Clink's 'Deuce@75' albums:

    http://donclink.com/deuce_75_1/images/dscn2950.jpg

    Using links from photo sites such as Photobucket can help in "size" issue with uploaded attachment files. For best viewing in web browsers, photos should be around the 800x600 pixel range, and probably not more than 1024x768. Most cameras today store HUGE jpg image files, as the default settings are in the 7, 8, 10, and 12Mb image sizes. The image files that are then attached are very large, and the browser can't display the full image size without using the scroll bars. Use the re-sizing functions of your photo editing software to reduce the image to 800x600, which reduces the file sixe and the image load time in the browser. Don uses Google's free Picassa3 software, which is an excellent photo management product. All of the photo albums of the Deuce, Grand National, and Auburn that are links on the NORG site were built using Picassa's web creation functions. And it's free? (THANKS to Don Clink for the info!)
  9. HOW DO I SHOW MY EMAIL ADDRESS ALONG WITH MY USERNAME? You can LogIn on the Forum, and select PREFERENCES. On this page Members can add optional information such as their City,State, Country; Occupation; Hobbies: list a Homepage; list AOL Instant Messanger Handle; Signature; "Make Email Address viewable to others;" and even change the number of Default Topics shown on a page. WHEN others click on your profile, they will see this information.

EFV-8 Club Forum / General Ford Discussion / 1946 Distributor rebuild

   Reply to this DiscussionReply to Discussion | Start new discussionNew Discussion << previous || next >> 
Posted By Discussion Topic: 1946 Distributor rebuild

Printer-friendly Version  send this discussion to a friend  new posts first

40 Coupe
01-25-2014 @ 4:49 AM
Senior
Posts: 1674
Joined: Oct 2009
          
MMO is "Marvel Mystery Oil" In the red plastic bottle on Wal-Mart shelf. NAPA has good points, rotor, condenser and the Crab cap. I believe their points do not have the bushings any more but they work well. Their condensers hold up to the engine heat. Check out NAPA web site. Make sure the point plate snap ring seats properly and the secondary coil contact is clean and contacts the proper contact location on the point plate. After replacing parts and before installing the distributor rotate it by hand make sure the rotor does not hit one or more of the cap terminals, if it does the terminal can be cut back slightly so the rotor clears.

supereal
01-24-2014 @ 7:29 AM
Senior
Posts: 6819
Joined: Oct 2009
          
Look at the threads in the connector. They should be sharp and fully formed. Examine the insulator to be sure the points are not shorted. Are the contact surfaces making a complete joint when closed? It isn't possible to check spring tension without a scale, and weak springs have been a problem. Be sure the rubbing block is of solid material. Poor quality point sets have become an epidemic problem. We buy ours from C&G. Have your distributor checked and set up on a machine, if possible, so they can be strobed to eliminate bounce. High quality points properly installed should run trouble free for years of service.

TomO
01-24-2014 @ 7:25 AM
Senior
Posts: 7250
Joined: Oct 2009
          
If the points don't have the brass bushing in the pivot hole, return them to the supplier. Check the spring tension after installing the points, many of the repro points do not have enough spring tension to keep the pints from floating, others have so much that the rubbing block wears out in a very short time. Tension should be between 20-24 oz.

Tom

ab4875
01-24-2014 @ 4:27 AM
Member
Posts: 27
Joined: Nov 2013
          
@ 40 Coupe - what is MMO?

@ supereal - what should I look for in new points? I bought some from one of the US suppliers a week or so back and they look ok to my untrained eyes. From memory country of origin on the bag was China or Taiwan. I'm going to order some other parts from Joblot in New York next week and could add some points to the order if they have a better quality item.

supereal
01-23-2014 @ 1:12 PM
Senior
Posts: 6819
Joined: Oct 2009
          
Be sure to check the shaft and both bushings before you reassemble the distributor. Many of the units that come to our shop need replacement of these items. Any slack will show on the machine as an unstable dwell reading when we strobe it. Be sure the flat springs in the weight section are not bent or broken, and that the new points are of good quality. Many are not.

40 Coupe
01-23-2014 @ 10:52 AM
Senior
Posts: 1674
Joined: Oct 2009
          
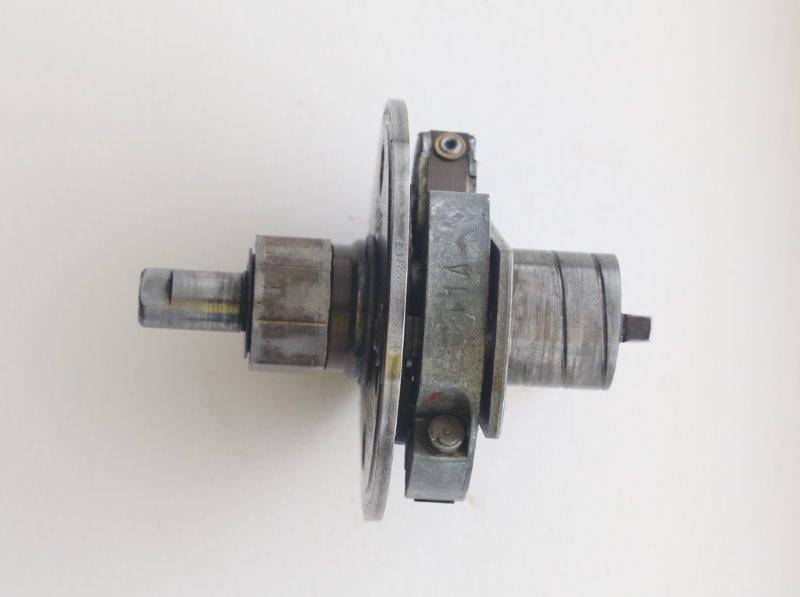
Inside the shaft and under the "grub" screw is a felt wick. Take needle nose pliers and pull it out soak it and clean it, dry it and then soak it in MMO and replace. Note the small hole in the side of the other end, for lube to upper bushing.
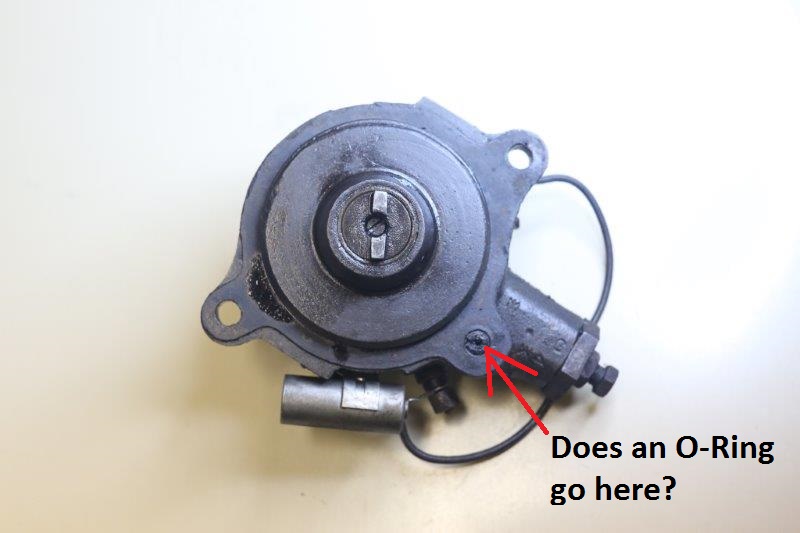
The vacuum port gets a special seal 1GA-12134.
The shaft should come apart by removing the small clip rings, best to disassemble and remove crud. Make sure rollers are free to rotate and weights are free on their shafts and springs are not damaged.

JM
01-23-2014 @ 10:48 AM
Senior
Posts: 822
Joined: Oct 2009
          
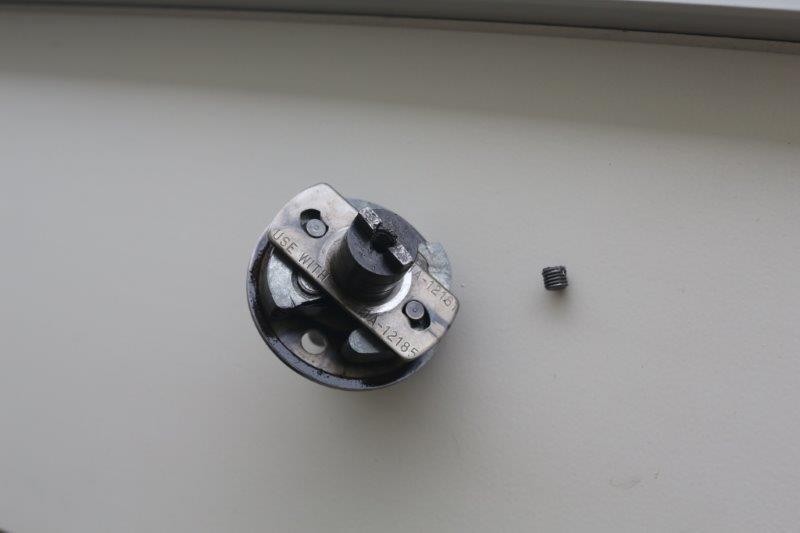
My '42 crab and '45-'48 rabbit ear cap distributors all have an o-ring on the back of the housing at that vacuum port. Yours appears to be blocked off with a slotted head set screw or grub screw as you call them. Edit: after enlarging your picture, I believe what I thought might be a set screw in the vacuum port is probably what's left of the rubber o-ring/gasket. Not sure exactly why there is a set screw in the center of the drive tangs but maybe this is there to seal up a threaded hole that was ounce used to hold a spacer adaptor in place..
You might want to consider posting these same questions and pictures over on the Fordbarn. There are several members there who rebuild these distributors as a service to the hobby and they are quite knowledgeable on how they should be rebuilt.
There is also a post on FB that was done in the last year by Bubbas Ignition that gives a detailed writeup with pictures on how to rebuild this type of distributor. Would be worth the time to go there and do a search for that post to read up on this.

http://www.fordbarn.com/forum/showthread.php?t=98214&highlight=crab

http://www.fordbarn.com/forum/showthread.php?t=11050&highlight=crab

John

This message was edited by JM on 1-23-14 @ 9:17 PM

ab4875
01-22-2014 @ 8:20 PM
Member
Posts: 27
Joined: Nov 2013
          
Is it worth taking this shaft apart or just clean it as is?

ab4875
01-22-2014 @ 8:18 PM
Member
Posts: 27
Joined: Nov 2013
          
Should I put an o-ring here to seal the vacuum port? The slot looks quite deep once I cleaned it up.

ab4875
01-22-2014 @ 8:17 PM
Member
Posts: 27
Joined: Nov 2013
          
I'm in the process of rebuilding my distributor. I've pulled it apart about 80%. Not quite sure how far to go.

There was a grub screw in the end of the shaft which had been staked. I removed this but I'm not sure what its purpose is? It looks like it is a blind hole.

Also should there be an o-ring where the distributor housing lines up with the vacuum port on the timing cover?

More pictures to follow

<< previous || next >> 


NOTE: YOU MUST BE A REGISTERED USER AND BE LOGGED IN TO POST (and reply to) messages in this forum. If you are a first time user, please click the CREATE A NEW ACCOUNT in the masthead above to register and Log In. After that, all you do is LOG IN to enjoy using this site.

DISCLAIMER: The V-8 Club does no independent testing of any of the opinions, thoughts or suggestions presented in the website on the Forum, in the Tech Tips section, or any section. A reader should consider the website to be a forum wherein differing solutions to a particular set of circumstances may be discussed. Ultimately, the selection of an item for an individual's vehicle must be based upon the independent study of the vehicle owner in consultation with people in the hobby and restoration experts.


EFV-8 Club Forum Home | Back to Home Page | Contact the Webmaster

Copyright © 2009 - EFV-8.org
Powered by < CF FORUM > v.2.1